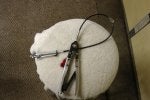
I got under the hood to do a coolant flush and saw the spring tension clamps. I tried to remove the easiest one first with a pair of channel locks. It wasn't very easy to do and I knew the bottom hose clamp would be much worse. So I went to the parts store and bought this. It wasn't the cheapest tool I've purchased at $30.00 but in the end I would have paid even more. I wasn't a fan of spring tension clamps until now. Now I think they were a pretty good invention. Here is a photo of the clamp tool.

Here is how I flushed my 2009 5.3L to get out all of the old coolant and grunge. I replaced the coolant with Prestone Dex. The orange premium stuff that is GM approved. Even though you can mix it with dexcool I flushed out the entire system to start fresh. It is very easy to do once you get the clamps off.
First you unplug the maf sensor and remove the air filter cover along with the maf sensor. Next remove the air filter and the air filter box. The air filter box is held down by three grommets and 2 plastic pins molded into the box. Do not try pull up on the box all at once, you may break the rear grommet. Pull up on the engine side of the box to release the 2 molded pins first. Then push the box towards the engine to release the rear grommet. The rear grommet slides on a track until it reaches an opening that lets you lift up on the rear of the box. You will see what I mean once you remove the box and look at the bottom it.
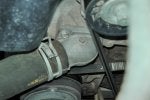
Now remove the bottom hose from the radiator using either the clamp tool (recommended) or channel locks and let it drain into a pan. There is no petcock, you must remove the hose. Next remove the radiator upper hose. Now I take my garden hose and flush out the radiator for several minutes from the upper radiator. Next remove the cap from the plastic reserve tank. With the garden hose inside the tank make a seal with your hands and flush out the system. If you seal it right you will see the fluid coming out of the upper radiator hose. It doesn't have to be a tight seal and probably shouldn't be. You don't want to over pressurize the system or hoses. Keep flushing until it becomes clear.
Loosely put the hoses back on You don't need the clamps and the hoses don't need to be tight. Fill up the system through the reserve tank but leave the pressure cap off. Turn on the heater and set the fan to full blast. Put the air filter cover back on the air duct hose and plug in the maf sensor. I didn't install the air filter box or air filter at this time.
Start the engine and idle for a couple of minutes. Check the tank, it probably has emptied already. Fill it about half way full. Now slowly rev the engine to about 3000 rpm and hold it for a few seconds. Slowly let it go back to idle. If you just let off the throttle chances are that the water in the tank will back splash out of the tank and make a mess, so slowly rev and let off the gas a few times. Check the tank again it will probably be empty again. Fill up half way and repeat the engine rev. The idea is to remove all of the air and circulate the water through the system. Also your heater core could air lock and you will not feel any heat coming out of the vents. At this point the vents should be getting pretty hot and the engine temp should be close to normal. Shut down the engine and let it cool. I just let it cool enough so it wont burn me.
Repeat the entire process. I used the garden hose and flushed everything 2 more times. Remember to not put the cap back on the reservoir tank when doing this. You do not want to pressurize the system.
Now go ahead and install the upper radiator hose permanently but install the lower hose loose. Using distilled water,it will take approx. 2 gallons (but not all at once) fill the system through the tank. It should take about 1 gallon before it's full. Start the engine and watch the tank empty. Fill it about halfway full and go do the engine revs. Check the tank again and refill it. Keep doing this and you should get the other gallon of distilled water in it. Check the heat coming out of the vents and make sure they are getting hot. Let idle for a couple of minutes and shut off the engine. Let it cool and remove the lower hose again and let it drain. Do this procedure with the distilled water one more time. Make sure it is taking 2 gallons when you do this. Why ? because the 2009 5.3L cooling system holds 16.9 quarts of fluid. 16 quarts mixed 50/50 would be 2 gallons antifreeze and 2 gallons distilled water. So you want to make sure when you do the next step you can get 2 gallons of straight concentrated antifreeze put in. After you flushed for the second time with distilled water shut off the engine and let it cool. Remove the lower hose and drain. Now you can reinstall the lower hose securely with the hose clamp. Reinstall the air box, air filter, and air filter cover. Don't forget to plug the maf sensor back in.
Using pure antifreeze (prestone dex) recommended pour the first gallon in the tank or as much as it will take. Pour it slowly, it is quite a bit thicker and pours slowly. Leave the cap off and start the engine. Check the tank and fill it about halfway with straight antifreeze. You will probably start using the second gallon by now. Start doing the engine revs slowly to 3000 rpm and slowly back to idle. Do this and check the tank again. You will probably be able to get the second in at this point. Go back and do your engine revs again and make sure you are getting heat out the heater vents. Check the tank again any you will notice it's kind foamy looking or odd looking. That's the air purging out of the system. Do some more engine revs and then let it idle for while, make sure the temp gauge is reading normal and you have good heat out of the vents. Shut the engine down and install the cap on the tank. After the engine has cooled check the tank. It should be low at this point. Fill to full cold mark either with a 50/50 mix or straight water. It wont make that much of a difference. Check the level in a couple days and make sure you don't have any leaks. That's it.
Gozzie
Here is how I flushed my 2009 5.3L to get out all of the old coolant and grunge. I replaced the coolant with Prestone Dex. The orange premium stuff that is GM approved. Even though you can mix it with dexcool I flushed out the entire system to start fresh. It is very easy to do once you get the clamps off.
First you unplug the maf sensor and remove the air filter cover along with the maf sensor. Next remove the air filter and the air filter box. The air filter box is held down by three grommets and 2 plastic pins molded into the box. Do not try pull up on the box all at once, you may break the rear grommet. Pull up on the engine side of the box to release the 2 molded pins first. Then push the box towards the engine to release the rear grommet. The rear grommet slides on a track until it reaches an opening that lets you lift up on the rear of the box. You will see what I mean once you remove the box and look at the bottom it.
Now remove the bottom hose from the radiator using either the clamp tool (recommended) or channel locks and let it drain into a pan. There is no petcock, you must remove the hose. Next remove the radiator upper hose. Now I take my garden hose and flush out the radiator for several minutes from the upper radiator. Next remove the cap from the plastic reserve tank. With the garden hose inside the tank make a seal with your hands and flush out the system. If you seal it right you will see the fluid coming out of the upper radiator hose. It doesn't have to be a tight seal and probably shouldn't be. You don't want to over pressurize the system or hoses. Keep flushing until it becomes clear.
Loosely put the hoses back on You don't need the clamps and the hoses don't need to be tight. Fill up the system through the reserve tank but leave the pressure cap off. Turn on the heater and set the fan to full blast. Put the air filter cover back on the air duct hose and plug in the maf sensor. I didn't install the air filter box or air filter at this time.
Start the engine and idle for a couple of minutes. Check the tank, it probably has emptied already. Fill it about half way full. Now slowly rev the engine to about 3000 rpm and hold it for a few seconds. Slowly let it go back to idle. If you just let off the throttle chances are that the water in the tank will back splash out of the tank and make a mess, so slowly rev and let off the gas a few times. Check the tank again it will probably be empty again. Fill up half way and repeat the engine rev. The idea is to remove all of the air and circulate the water through the system. Also your heater core could air lock and you will not feel any heat coming out of the vents. At this point the vents should be getting pretty hot and the engine temp should be close to normal. Shut down the engine and let it cool. I just let it cool enough so it wont burn me.
Repeat the entire process. I used the garden hose and flushed everything 2 more times. Remember to not put the cap back on the reservoir tank when doing this. You do not want to pressurize the system.
Now go ahead and install the upper radiator hose permanently but install the lower hose loose. Using distilled water,it will take approx. 2 gallons (but not all at once) fill the system through the tank. It should take about 1 gallon before it's full. Start the engine and watch the tank empty. Fill it about halfway full and go do the engine revs. Check the tank again and refill it. Keep doing this and you should get the other gallon of distilled water in it. Check the heat coming out of the vents and make sure they are getting hot. Let idle for a couple of minutes and shut off the engine. Let it cool and remove the lower hose again and let it drain. Do this procedure with the distilled water one more time. Make sure it is taking 2 gallons when you do this. Why ? because the 2009 5.3L cooling system holds 16.9 quarts of fluid. 16 quarts mixed 50/50 would be 2 gallons antifreeze and 2 gallons distilled water. So you want to make sure when you do the next step you can get 2 gallons of straight concentrated antifreeze put in. After you flushed for the second time with distilled water shut off the engine and let it cool. Remove the lower hose and drain. Now you can reinstall the lower hose securely with the hose clamp. Reinstall the air box, air filter, and air filter cover. Don't forget to plug the maf sensor back in.
Using pure antifreeze (prestone dex) recommended pour the first gallon in the tank or as much as it will take. Pour it slowly, it is quite a bit thicker and pours slowly. Leave the cap off and start the engine. Check the tank and fill it about halfway with straight antifreeze. You will probably start using the second gallon by now. Start doing the engine revs slowly to 3000 rpm and slowly back to idle. Do this and check the tank again. You will probably be able to get the second in at this point. Go back and do your engine revs again and make sure you are getting heat out the heater vents. Check the tank again any you will notice it's kind foamy looking or odd looking. That's the air purging out of the system. Do some more engine revs and then let it idle for while, make sure the temp gauge is reading normal and you have good heat out of the vents. Shut the engine down and install the cap on the tank. After the engine has cooled check the tank. It should be low at this point. Fill to full cold mark either with a 50/50 mix or straight water. It wont make that much of a difference. Check the level in a couple days and make sure you don't have any leaks. That's it.
Gozzie