

Cleaning a MAF is one of the easiest things you can do to keep your vehicle idling and running smoothly. Generally, this is a novice level activity. The only thing that could make it difficult is if your particular MAF is located in a hard to reach area. I have always done this at a frequency of every other oil change, or every 10,000 to 12,000 miles.
What is a MAF?
The Mass Air Flow sensor is used to measure the amount of air entering the engine. This measurement is used by the engine computer or ECM to calculate proper amount of fuel injected into the cylinders in order to provide optimum combustion and low emissions.
Problems with Mass Air Flow sensors are common. Bad or contaminated Mass Air Flow sensor can possibly cause a wide range of various vehicle driveability problems such as stalling, especially when the engine is cold, misfiring, poor acceleration, etc.
In addition, a problem with the Mass Air Flow sensor often causes the "check engine" or "service engine soon" light in the vehicle instrument panel to illuminate.
How to Clean a MAF:
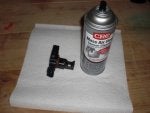
1. Buy a quality MAF cleaner. DO NOT use carb or throttle body cleaner, or any other solvents. As you will see, the MAF is a very sensitive part. Use only the approved solvent, and follow the directions on the can carefully.

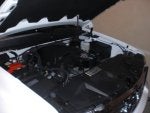
2. Open the hood of the vehicle.

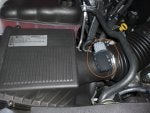
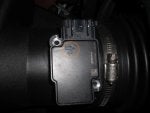
3. Locate the air filter housing. Usually, the MAF will be just "downstream" of the air filter, in the tube that carries air to the resonator and throttle body. You can see the MAF and it's related connector circled in this photo:

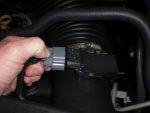
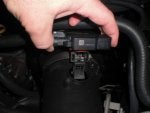
4. Release the electrical connection on the MAF. There is a small tab that holds the connection in place.

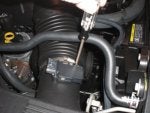
5. Using either a phillips screwdriver or a torx bit (my truck uses a T-10 torx), unscrew the screws holding the MAF in place.

6. Make sure you know what direction the MAF is in place. Often, you will see an airflow arrow to help you. Make sure you are able to put the MAF back in the same direction later!

7. Carefully remove the MAF. Note the thin wires that run across the MAF. When this unit is in operation, those wires get hot. Simply stated, the rate (resistance) at which the wires heat or cool gives the computer the inofrmation about how much air is moving across them, and into the engine. When they are dirty, your ECM cannot correctly determine the airflow.


8. Set the MAF on a paper towel or clean shop rag. Follow the directions on the can to spray the solvent on the MAF. Be careful that the spray tube or other things do not bump the MAF. Again, the wires are fragile. Spray the MAF from all sides, and then allow it to dry. Make sure the MAF is fully dry before reassembling.

9. Reassemble the MAF. Ensure you install it in the correct direction. Also ensure the wire harness is re-connected.
10. It is not required, but I also ensure that I disconnect the battery while I complete this procedure. Doing so will reset your ECM, and will take into account this cleaned MAF!
You did it! Congratulations!
What is a MAF?
The Mass Air Flow sensor is used to measure the amount of air entering the engine. This measurement is used by the engine computer or ECM to calculate proper amount of fuel injected into the cylinders in order to provide optimum combustion and low emissions.
Problems with Mass Air Flow sensors are common. Bad or contaminated Mass Air Flow sensor can possibly cause a wide range of various vehicle driveability problems such as stalling, especially when the engine is cold, misfiring, poor acceleration, etc.
In addition, a problem with the Mass Air Flow sensor often causes the "check engine" or "service engine soon" light in the vehicle instrument panel to illuminate.
How to Clean a MAF:
1. Buy a quality MAF cleaner. DO NOT use carb or throttle body cleaner, or any other solvents. As you will see, the MAF is a very sensitive part. Use only the approved solvent, and follow the directions on the can carefully.
2. Open the hood of the vehicle.
3. Locate the air filter housing. Usually, the MAF will be just "downstream" of the air filter, in the tube that carries air to the resonator and throttle body. You can see the MAF and it's related connector circled in this photo:
4. Release the electrical connection on the MAF. There is a small tab that holds the connection in place.
5. Using either a phillips screwdriver or a torx bit (my truck uses a T-10 torx), unscrew the screws holding the MAF in place.
6. Make sure you know what direction the MAF is in place. Often, you will see an airflow arrow to help you. Make sure you are able to put the MAF back in the same direction later!
7. Carefully remove the MAF. Note the thin wires that run across the MAF. When this unit is in operation, those wires get hot. Simply stated, the rate (resistance) at which the wires heat or cool gives the computer the inofrmation about how much air is moving across them, and into the engine. When they are dirty, your ECM cannot correctly determine the airflow.
8. Set the MAF on a paper towel or clean shop rag. Follow the directions on the can to spray the solvent on the MAF. Be careful that the spray tube or other things do not bump the MAF. Again, the wires are fragile. Spray the MAF from all sides, and then allow it to dry. Make sure the MAF is fully dry before reassembling.
9. Reassemble the MAF. Ensure you install it in the correct direction. Also ensure the wire harness is re-connected.
10. It is not required, but I also ensure that I disconnect the battery while I complete this procedure. Doing so will reset your ECM, and will take into account this cleaned MAF!
You did it! Congratulations!


")


