So you got a sweet lift kit or upgraded your upper control arms and then you realize using a 4 pound sledge to remove alignment bolts from an 11 year old truck can do more damage than you'd like. I just went through all this yesterday and decided to share how to fix your alignment.
Time taken: 30 minutes to 2 hours. Dependent upon what needs to be done to the front end.
Tools used: Flathead screwdriver, various sized sockets and wrenches, hammer, Channel locks, Drill (only for a seized bushing)
Parts to buy:
Alignment pins - Moog PN: K6716
Alignment bolts - Raybestos PN: 611-1211 (Moog also makes a kit)
Step 1: Jack the truck up. Make sure there's a chock under the rear wheels and the parking brake is on. I used a jack right underneath the lower control arm to raise the truck and a block of wood and a jack stand to support the bottom of the lift. If you do not have a lift, you can place stands underneath the frame.
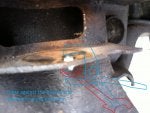
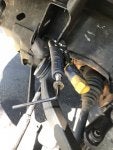
Step 2: Remove both cam bolts on the control arms. Make sure you keep these as you need them for alignments. You can take note of their positions but the chances of getting them back in perfect alignment after this is a little unlikely. Hammer the upper control arm if needed to dislodge it. These things can get pretty stubborn, but if you wiggle it correctly and hammer when you need to, it should break free. Most of the time, a seized bushing will cause this to be difficult (especially if the control arm has been on for 11 years). You do not need to remove the control arm completely to replace the pins so you can keep the ball joint connected to the spindle; just be sure to not beat on it too much while removing the control arm. If you must remove the ball joint, remove the cotter pin and take the bolt off. You'll need to use a hammer and bang on the spindle to remove the ball joint. Don't pry on the ball joint and DO NOT hammer the bottom of the bolt; if you miss and screw up your bolts threads it will be quite a pain to get back together and you might possibly need new ball joints to make up for this.
![Image]()
Step 3: If you're like me and you don't have pins at all because they fell out on the side of the road, then take a Moog pin and set it in the factory hole.

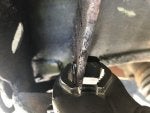
Step 4: These are direct "press on" pins for which I used an Irwin channel lock or pliers and a 20mm wrench. I put the hole side of the wrench where the alignment pin comes through and used that to leverage the channel locks and press on the pin in order to squeeze it through the hole. If you do this without a spot for the pin to go through, the pin may hit the channel locks and you'll be stuck in a constant limbo of fighting with yourself. I apologize for the lack of pics, if I had three arms this would be more detailed.

Step 5: Reinstall your control arms and tighten the cam bolts down. If you bought new bolts because you snapped a bolt like I did, now would be the time to put them in. When I installed my lift, we snapped an alignment bolt and had to buy another bolt close to the same size and shave it down; that was only Band-Aid. If you took a note as to where the position was, try to get it back to that position. Regardless, you will need an alignment after this so you don't end up eating tires, especially if you're running a mud terrain.
It's a pretty easy fix but I wrote this up for people who aren't as savvy with things like this. I have no doubt in my mind that anyone can do this at home, it's all "press in" and not many know about this part number. Every shop I took my truck to had no idea how to fix this or wanted buckets of money. I did this fix for less than $30.
***SPECIAL NOTE: ***
If you have a seized bushing, the best way to remove it is to use a drill and start drilling it out. Go around the circumference (outer edge) of the bushing and run the bit for a second or two. Once you're all the way drilled in, it will heat it up and this will help with removal. Then just use a flathead and pull the bushing out.
Hope this helps some of you out who have gotten burned doing an install, have had parts being sent to you incorrectly and/or when you get into one of those "point of no return" moments and have to perform a Band-Aid until you get the funds or parts to fix it.
Time taken: 30 minutes to 2 hours. Dependent upon what needs to be done to the front end.
Tools used: Flathead screwdriver, various sized sockets and wrenches, hammer, Channel locks, Drill (only for a seized bushing)
Parts to buy:
Alignment pins - Moog PN: K6716
Alignment bolts - Raybestos PN: 611-1211 (Moog also makes a kit)
Step 1: Jack the truck up. Make sure there's a chock under the rear wheels and the parking brake is on. I used a jack right underneath the lower control arm to raise the truck and a block of wood and a jack stand to support the bottom of the lift. If you do not have a lift, you can place stands underneath the frame.
Step 2: Remove both cam bolts on the control arms. Make sure you keep these as you need them for alignments. You can take note of their positions but the chances of getting them back in perfect alignment after this is a little unlikely. Hammer the upper control arm if needed to dislodge it. These things can get pretty stubborn, but if you wiggle it correctly and hammer when you need to, it should break free. Most of the time, a seized bushing will cause this to be difficult (especially if the control arm has been on for 11 years). You do not need to remove the control arm completely to replace the pins so you can keep the ball joint connected to the spindle; just be sure to not beat on it too much while removing the control arm. If you must remove the ball joint, remove the cotter pin and take the bolt off. You'll need to use a hammer and bang on the spindle to remove the ball joint. Don't pry on the ball joint and DO NOT hammer the bottom of the bolt; if you miss and screw up your bolts threads it will be quite a pain to get back together and you might possibly need new ball joints to make up for this.

Step 3: If you're like me and you don't have pins at all because they fell out on the side of the road, then take a Moog pin and set it in the factory hole.
Step 4: These are direct "press on" pins for which I used an Irwin channel lock or pliers and a 20mm wrench. I put the hole side of the wrench where the alignment pin comes through and used that to leverage the channel locks and press on the pin in order to squeeze it through the hole. If you do this without a spot for the pin to go through, the pin may hit the channel locks and you'll be stuck in a constant limbo of fighting with yourself. I apologize for the lack of pics, if I had three arms this would be more detailed.
Step 5: Reinstall your control arms and tighten the cam bolts down. If you bought new bolts because you snapped a bolt like I did, now would be the time to put them in. When I installed my lift, we snapped an alignment bolt and had to buy another bolt close to the same size and shave it down; that was only Band-Aid. If you took a note as to where the position was, try to get it back to that position. Regardless, you will need an alignment after this so you don't end up eating tires, especially if you're running a mud terrain.
It's a pretty easy fix but I wrote this up for people who aren't as savvy with things like this. I have no doubt in my mind that anyone can do this at home, it's all "press in" and not many know about this part number. Every shop I took my truck to had no idea how to fix this or wanted buckets of money. I did this fix for less than $30.
***SPECIAL NOTE: ***
If you have a seized bushing, the best way to remove it is to use a drill and start drilling it out. Go around the circumference (outer edge) of the bushing and run the bit for a second or two. Once you're all the way drilled in, it will heat it up and this will help with removal. Then just use a flathead and pull the bushing out.
Hope this helps some of you out who have gotten burned doing an install, have had parts being sent to you incorrectly and/or when you get into one of those "point of no return" moments and have to perform a Band-Aid until you get the funds or parts to fix it.