

Subject: Using the Aftermarket Utilization connector (X14) of the MBEC for Accessories for GMT-900 trucks
Topic Description: The MBEC is located underneath the drivers side dash and contains the Aftermarket Utilization connector that can be used to power added accessories. The connection block has a 15 amp battery feed, 30 amp battery feed, 10 amp Run/Crank feed, 300 milliamp Retained Accessories Power (RAP) trigger, and ground. The two battery feeds (always hot) and Run/Crank feed can be wired directly to accessories that draw less than the stated amps. The retained power accessories pin can be used to trigger a relay or amp remote turn on. It cannot be used to directly power a device. A diode should be used with relays. You can push small crimp on terminals from the auto parts store over the pins, but the guide below will cover the correct way to use the connection block with the proper connectors.
*Warning* - Do not use these instruction on "Hybrid" model trucks. See GM UI Bulletin 89c for instructions.
https://www.gmupfitter.com/files/media/photo/808/UI Bulletin 89c_7_2017.pdf
Requirements:
*Skill Level: Basic 12V wiring knowledge required
*Time: 2 hours or less
*Special Tools: Multimeter/test light, wire stripper/crimper and/or soldering iron
The following parts are needed:
*GM Connector P/N 20791502
*Automotive Connectors FMALE 280 SERIES TIN CBL RNG P/N 15304711-L
The following parts are optional and depend on the accessories being installed:
*5 Pin SPDT relay and harness for high amp accessories
*Diode for use with a relay GM P/N 12112422 or equivalent
*heat shrink tubing or electrical tape
*automotive copper wire
*butt splices or soldering iron or similar connectors
I recommend that you order several extra pins.
Step-by-Step Instructions:
Locate the MBEC under the drivers side of the dash. Gently remove the cover by wiggling the edges and pulling it back. There is a plastic prong panel clip in the center that you don't want to damage.


The X14 junction block is the last connector on the left (my hand is holding my accessories wires going to it).

Here is a shot of the X14 connector (P/N 20791502) with the pins labeled according to my table below.

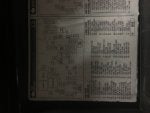
The table below shows what each pin can be used for. Accessories drawing more than 30 amps should be wired to the battery or under hood fuse block posts. A relay should be used with the RAP pin for anything other than something like an amp remote turn on.
![Image]()
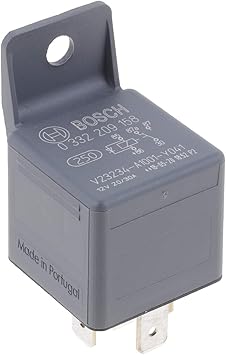
If you want the accessories to stay on with RAP (like your radio), you will need to purchase a 12V automotive relay as pictured below. The harness is not required, but they are not very expensive and make it safer/easier to remove or install the relay. For more information on wiring a relay, please visit http://www.the12volt.com/relays/relays.asp . The RAP (Pin 8) would be the trigger, the Battery Feed (Pin 2 or Pin 5) would be the 12V+ supply, ground to ground, and finally the output pin of the relay to your accessory. If you want Run/Crank to be the trigger (and need more than 10A), you could substitute Pin 7 for Pin 8. A diode should be installed across the coil of the solenoid. One end of the diode should be connected to the positive terminal of the coil and the other end of the diode should be connected to ground. For GM P/N 12112422, the striped end of the diode connects to the positive relay pin.

Even though I have checked and documented the pins for ground and 12V+ on my 2012, I highly recommend that you do the same before connecting any accessory to the MBEC in your truck. You can check the pins with a circuit tester (pictured below) or multi-meter set to 12V DC. I used both while investigating. You can check by confirming that the certain pins are always hot and that the others are hot only when the key is in the proper position. Checking will take just a few minutes, but could save your electronics if something is different on your particular model/year.

Conclusion: You can use the X14 Aftermarket Utilization connector in the MBEC to power accessories in the cab. The connector gives you the flexibility to have your accessories always powered, powered with RAP, or powered with Run/Crank. You can power extra 12v outlets wired to the ignition (useful for GPS) or switches that are wired to relays outside of the cab for light bars and other accessories easily with this method. One way diodes are recommended by GM when using relays. Failure to use a diode could result in module damage. Official GM Upfitter Electrical Manuals were used as the reference for creating this guide.
Topic Description: The MBEC is located underneath the drivers side dash and contains the Aftermarket Utilization connector that can be used to power added accessories. The connection block has a 15 amp battery feed, 30 amp battery feed, 10 amp Run/Crank feed, 300 milliamp Retained Accessories Power (RAP) trigger, and ground. The two battery feeds (always hot) and Run/Crank feed can be wired directly to accessories that draw less than the stated amps. The retained power accessories pin can be used to trigger a relay or amp remote turn on. It cannot be used to directly power a device. A diode should be used with relays. You can push small crimp on terminals from the auto parts store over the pins, but the guide below will cover the correct way to use the connection block with the proper connectors.
*Warning* - Do not use these instruction on "Hybrid" model trucks. See GM UI Bulletin 89c for instructions.
https://www.gmupfitter.com/files/media/photo/808/UI Bulletin 89c_7_2017.pdf
Requirements:
*Skill Level: Basic 12V wiring knowledge required
*Time: 2 hours or less
*Special Tools: Multimeter/test light, wire stripper/crimper and/or soldering iron
The following parts are needed:
*GM Connector P/N 20791502
*Automotive Connectors FMALE 280 SERIES TIN CBL RNG P/N 15304711-L
The following parts are optional and depend on the accessories being installed:
*5 Pin SPDT relay and harness for high amp accessories
*Diode for use with a relay GM P/N 12112422 or equivalent
*heat shrink tubing or electrical tape
*automotive copper wire
*butt splices or soldering iron or similar connectors
I recommend that you order several extra pins.
Step-by-Step Instructions:
Locate the MBEC under the drivers side of the dash. Gently remove the cover by wiggling the edges and pulling it back. There is a plastic prong panel clip in the center that you don't want to damage.
The X14 junction block is the last connector on the left (my hand is holding my accessories wires going to it).
Here is a shot of the X14 connector (P/N 20791502) with the pins labeled according to my table below.
The table below shows what each pin can be used for. Accessories drawing more than 30 amps should be wired to the battery or under hood fuse block posts. A relay should be used with the RAP pin for anything other than something like an amp remote turn on.
If you want the accessories to stay on with RAP (like your radio), you will need to purchase a 12V automotive relay as pictured below. The harness is not required, but they are not very expensive and make it safer/easier to remove or install the relay. For more information on wiring a relay, please visit http://www.the12volt.com/relays/relays.asp . The RAP (Pin 8) would be the trigger, the Battery Feed (Pin 2 or Pin 5) would be the 12V+ supply, ground to ground, and finally the output pin of the relay to your accessory. If you want Run/Crank to be the trigger (and need more than 10A), you could substitute Pin 7 for Pin 8. A diode should be installed across the coil of the solenoid. One end of the diode should be connected to the positive terminal of the coil and the other end of the diode should be connected to ground. For GM P/N 12112422, the striped end of the diode connects to the positive relay pin.
Even though I have checked and documented the pins for ground and 12V+ on my 2012, I highly recommend that you do the same before connecting any accessory to the MBEC in your truck. You can check the pins with a circuit tester (pictured below) or multi-meter set to 12V DC. I used both while investigating. You can check by confirming that the certain pins are always hot and that the others are hot only when the key is in the proper position. Checking will take just a few minutes, but could save your electronics if something is different on your particular model/year.
Conclusion: You can use the X14 Aftermarket Utilization connector in the MBEC to power accessories in the cab. The connector gives you the flexibility to have your accessories always powered, powered with RAP, or powered with Run/Crank. You can power extra 12v outlets wired to the ignition (useful for GPS) or switches that are wired to relays outside of the cab for light bars and other accessories easily with this method. One way diodes are recommended by GM when using relays. Failure to use a diode could result in module damage. Official GM Upfitter Electrical Manuals were used as the reference for creating this guide.
")


